| SWITCHING FROM TELCO TO POCO |
|---|
|
| 1. |
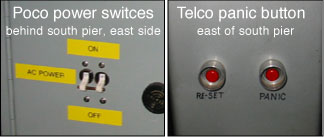
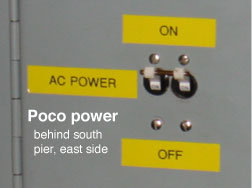
Turn off power at the telescope for poco and telco:
Flip ganged poco power switches to off.
Press telco panic button (to make sure it's off you can press reset
button first, then press panic). |
 |
|---|
|
| 2. |
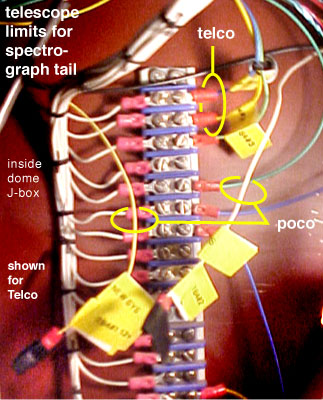
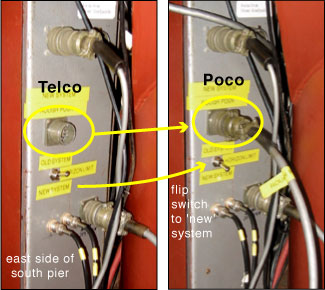
Switch spectrograph limits from telco to poco.
Remove front cover from dome j-box (east side of south pier).
Remove the wires labeled
"TB4-1" and "TB4-2".
Attach the wires labeled
"TB4-1 NEW SYS" and "TB4-2 NEW SYS".
Tape the ends of the wires you've disconnected.
 | |
|---|
|
| 3. |
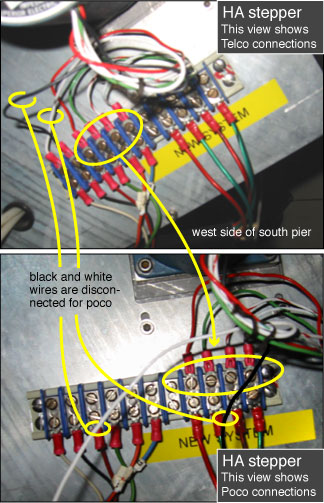
Switch the HA stepper control from telco to poco.
Disconnect the leftmost wires (black and white). Leave them
hanging so that they don't touch each other or anything else.
Move each remaining wire, one at a time) from the telco side
to the 'new system' side (poco). The wires go in the same
order, so the rightmost wire on the telco side, goes to the
rightmost wire on the poco side. The second rightmost wire on
the telco side goes to the 2nd rightmost connector on the
poco side, and so on.
When you're done you should have
white/faded blue stripe --> rightmost connection
white/red stripe --> 2nd rightmost connection
green --> 3rd rightmost connection
red --> 4th rightmost connection
white --> disconnected
black --> disconnected
 | |
|---|
|
| 4. |
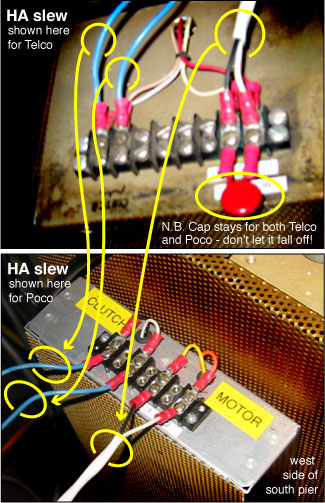
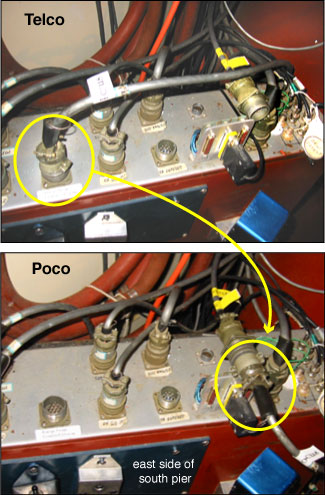
Switch the HA slew motor control from telco to poco.
Disconnect the black and white wires from the telco motor
control. Be careful not to drop the capacitor, and leave
at least one of the screws tight enough so that it wont fall
off.
Disconnect the 2 blue wires connected to the clutch on the
telco motor control
Connect the black wire to the 'new system' connector labeled
motor 1.
Connect the white wire to the 'new system' connector labeled
motor 2.
Connect the blue wires to the two clutch connectors on the
'new system' controller. Order is not important.
 | |
|---|
|
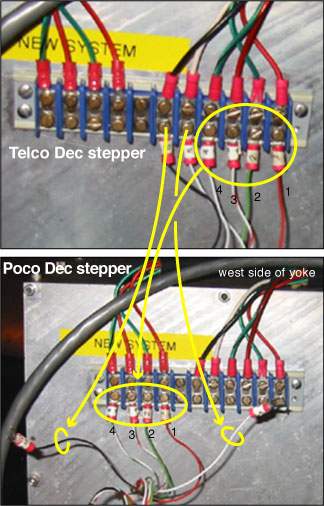
| 5. |
Switch the Dec stepper control from telco to poco.
Disconnect the leftmost wires (black and white). Leave them
hanging so that they don't touch each other or anything else.
Move each remaining wire, one at a time) from the telco side
to the 'new system' side (poco). The wires go in the same
order, so the rightmost wire on the telco side, goes to the
rightmost wire on the poco side. The second rightmost wire on
the telco side goes to the 2nd rightmost connector on the
poco side, and so on.
When you're done
wires 5 and 6 should be disconnected
wire 4 --> leftmost connector
wire 3 --> 2nd leftmost connector
wire 2 --> 3rd leftmost connector
wire 1 --> 4th leftmost connector
 | |
|---|
|
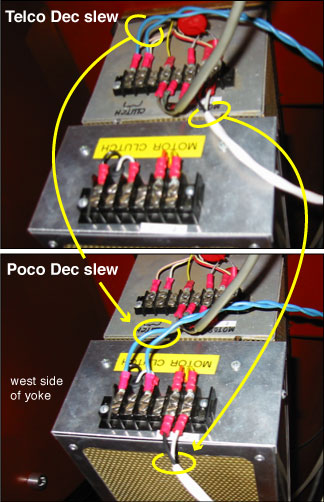
| 6. |
Switch the Dec slew motor control from telco to poco.
(Some of the clutch screws are stripped, see the picture for
how I connect it.)
Disconnect the black and white wires from the telco motor
control.
Disconnect the 2 blue wires connected to the clutch on the
telco motor control
Connect the black wire to the 'new system' connector labeled
motor 1.
Connect the white wire to the 'new system' connector labeled
motor 2.
Connect the blue wires to the two clutch connectors. Order
is not important.
 | |
|---|
|
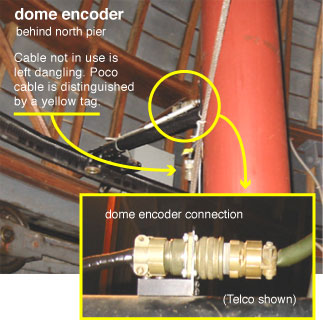
| 7. |
Switch the dome encoder cable from telco to poco.
Just switch the cables, they should both be close to the
dome encoder connector. The 'new system' (poco) cable should
be labeled.
|  |
|---|
|
| 8a. |
Disconnect the rough position pots from telco.
Turn off telco.
Walk behind telco and disconnect the rough position pot cable.
Turn telco back on.
 | |
|---|
| 8b. |
Connect the rough position pots to poco
Back in the dome, find the rough position pot cable and
connect it to the rough position connector on the red box.
Next to the connector is a switch, flip the switch to
'new system'. (This is for the elevation hardware limit.)
 | |
|---|
|
| 9. |
Switch the secondary mirror control from telco to poco.
Disconnect the secondary mirror cable from the red box.
The poco connection is a cable that's usually found sitting
on the red box. Connect the 2 cables together.
 | |
|---|
|
| 10. |
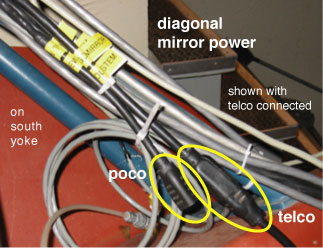
Switch the diagonal mirror control from telco to poco.
The connectors are standard 3 prong connectors (they're
made from black extension cords) and are labeled. Plug
the diagonal mirror cable into the 'new system' cable.
 | |
|---|
|
| 11. |
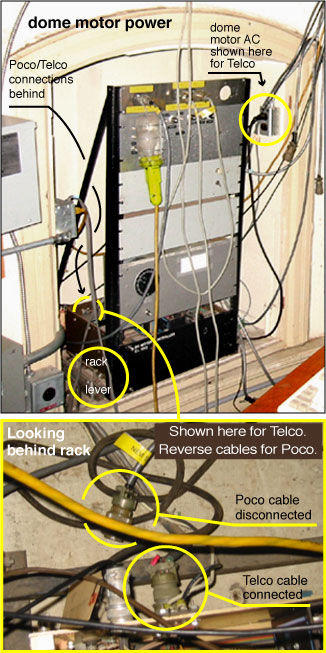
Switch the dome motor from telco to poco.
N.B. The AC power cord must be plugged into the power strip on the floor for Poco
(not shown), and into the wall outlet in the niche for Telco (the latter is
switched by the "Panic" button.)
Unplug the dome motor AC from the power outlet on the wall in
the niche.
Pull the lever on the side of the panel and slide the
panel out.
Disconnect the telco cable and connect the 'new system'
cable. The connector is hard to reach.
Plug the dome motor AC back into the power strip on the floor( not shown).
 | |
|---|
|
| 12. |
Start the poco server.
Flip the ganged power switches to on on the gray box.
Log on to athens as user and enter /usr/local/lick/sbin/poco
 | |
|---|
|
| 13. |
Log on to nickel as root and kill telcod |
|---|
| 14. |
Log on to bernard as user and start telcod
/usr/local/lick/etc/init.d/telcod start |
|---|
| 15. |
Log on to redeye as user and start the guider (or restart it)
There should be a message about being able to talk
to telcod. |
|---|
| 16. |
Log on to bernard as user and start poco_ui and vjs |
|---|
| 17. |
Test the system.
Homing the XX and YY axes is a good way to check that
the motors are connected properly. Be ready to hit
E-stop or kill power if something goes wrong. |
|---|
|