Scripts for Observing and Calibrations
ShARCS dithering and calibration scripts are run using ScriptProc. It is started on the computer covert with the command scriptproc.tcl. This brings up the GUI shown in Figure 1.

Figure 1: Script GUI, scriptproc.tcl
The basic scriptproc GUI allows one to take multiple exposures with the current exposure settings in sharcs_fe. To do this, set NExpose to the number of desired exposures. The new setting will not be used (and will display a yellow background), until the Set button is pressed (at which time the background will revert back to the default white color). To start the exposure sequence, press the Go button. As the exposures progress the Exposure # will increment indicating how many exposures have been completed and Exposure will display the image in progress sequence number.
AO mode displays which mode the ShaneAO system is operating in, either NGS, Natural Guide Star, or LGS, Laser Guide Star.
The check boxes in the GUI are shown with their default settings. If one wants to test a new script, check the Test Mode box and no commands to either ShARCS or ShaneAO will be sent. This is useful for checking syntax and logic when the instrument is either not available or otherwise being used.
The other four checkboxes determine which actions are performed during scripts. All four should be checked for normal dithering script operation. When Nod-Telescope is checked, the telescope move commands from scripts will be performed. When checked, Nod-WFS moves the appropriate motors for NGS or LGS mode in the ShaneAO system to keep the guide star (natural or laser) on the wavefront sensor so AO corrections can be done. AutoOpenLoops will open the adaptive optics control loops on the guide star before performing and telescope or motor moves. AutoCloseLoops will automatically close loops once all telescope and motor moves associated with a dither have been completed. The AO operator will advise if any of these checkboxes needs to be unchecked due to special cases or problems with the AO system operation.
The File menu has two options Source... and Quit and will also list the currently loaded scripts (see Figure 2 for example). Quit is self-explanatory. Source... allows one to load a script for use. By default no scripts are loaded when scriptproc.tcl is started. When one clicks on Source... a file selection window will appear showing the names of all available scripts. The currently available scripts are bxy.tcl, rbxy.tcl, sky4.tcl, and imagesharpen.tcl. Each script is described in detail below. If none of the available scripts suits the needs of the science program, consult with a support astronomer who may be able to create an appropriate script.
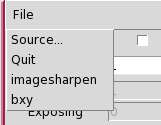
Figure 2: File Menu showing two loaded scripts, imagesharpen and bxy.
Available Scripts
Bxy | rbxy | sky4 | imagesharpen
The Bxy dither script is the most commonly used dithering
script. The script will do NExpose number of exposures (as
configured in sharcs_fe) at each position of
the script. Positions are determined by the Object Dither
Scale (in arcseconds). The dither script will put the science
target at the corners of a box two times the Object Dither Scale in
width, starting with moving the telescope NE. If the Expose at
starting positon? checkbox is checked, the script will start with
taking NExpose exposures at the starting position before executing the
initial telescope dither move. At the end of the script, the
telescope will be returned to the starting position. In NGS mode a
maximum dither scale of 4 arcseconds is recommended.
The rbxy dither script functions similarly to the bxy script. The primary difference is the dither scale
in the North/South (NS) direction can be different than in the
East/West direction (EW).
The sky4 dither script is designed to make getting a set of sky
background frames and functions similarly to the bxy. The primary difference is that the ShaneAO system
will expect that there is no star (natural or artificial) to close
loops on, so will not move any field steering motors nor close loops
after each telescope move.
The imagesharpen script is used to assist calibration of the
ShaneAO system by iteratively adjusting the selected Zernike modes on
the woofer deformable mirror to improve the Strehl ratio. This script
is normally used by the technical staff at Lick Observatory during the
afternoon configuration of the instrument to ensure peak performance
of the system. It is sometimes used on sky (when conditions are
stable enough) to improve Strehl if there is a static aberration
apparent in the images that needs to be corrected.
NExpose is the number of exposures to take at each mode
value. Recommended value is 1. Press the Set button to make
sure the new value for NExpose is accepted for use.
Image Sharpening Step Size is amount of change of each mode for
each iteration of the script. Recommended value is 0.15 (allowed
range is 0 to 1.0).
Each Zernike mode has a checkbox next to it and will only be adjusted
during the script if checked. By default only Focus, Astigmatism, and
Astigmatism45 are checked, as those are the primary modes that usually
need ajustment. The value of each mode during the script is displayed
to its right so the progress of the script can be monitored as well as
displaying the set value. Note that all modes are actually offsets
from the current reference centroids loaded into the ShaneAO real-time
control system.
The Zero Modes button will set all the modes back to
zero. Generally this button should be pressed after any new modes are
saved (either when Auto Save Modes is checked or when Save
File is clicked.
When Auto Save Modes is checked, a new reference centroid file
will be saved using an appropriate file name set from the state of
system. If the script needs to be re-run with different modes
checked, the modes should be zeroed first by pressing the Zero
Modes button, otherwise the offsets just saved will be applied a
second time, degrading the image.
If the modes were not auto saved, a file name base can be entered in
the entry box left of the Save File button. The subaperture
mode (_16xLGS or _8xLGS) and .fits extention will be automatically
added to the entered file name. When Save File is pressed, the
new reference centroid file will be saved and loaded into the ShaneAO
real-time code with the specified file name.
To adjust each mode manually, the imageSharpen GUI can be run on shade
(gavel@shade:local/bin/imageSharpen).
BXY Dither Script
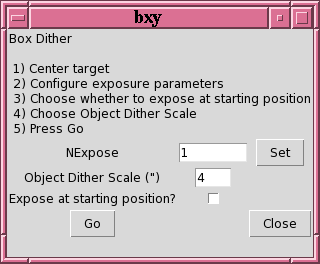
Figure 3: Bxy Dither script GUI
RBXY Dither Script
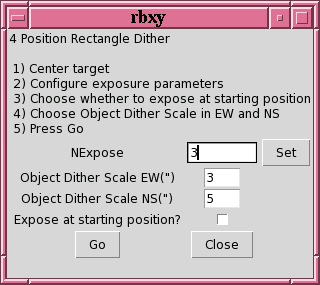
Figure 4: RBxy Dither script GUI
SKY4 Dither Script
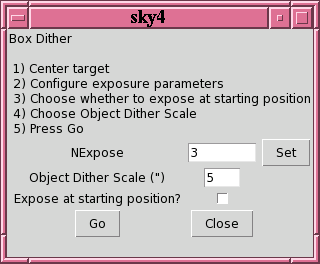
Figure 5: Sky Dither script GUI
IMAGESHARPEN Script
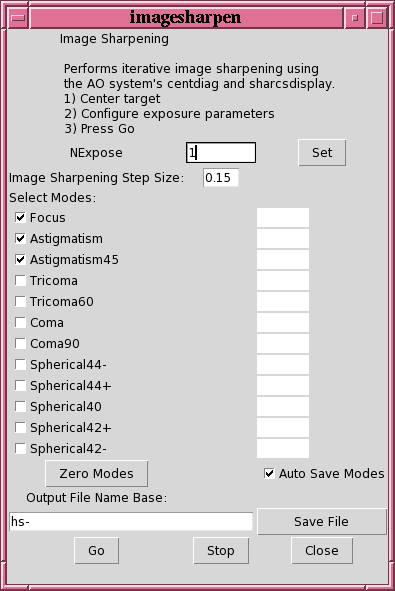
Figure 6: Image Sharpening Calibration script GUI
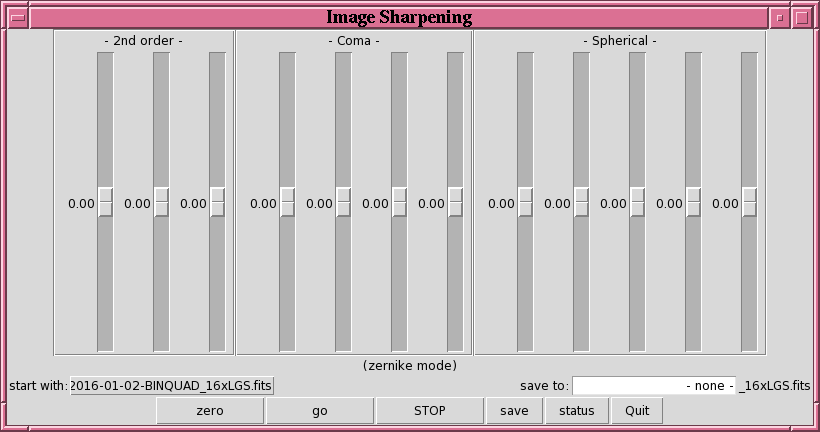
Figure 7: imageSharpen GUI for manually adjusting Zernike modes.
sa@ucolick.org
Last modified: Mon Jan 4 09:58:38 PST 2016