IRCAL Graphical User Interface - ircalui
MainMotors/Filters
WFS Steering/Nodding
Telescope Offset Control
Exposure Palette
Dark Widget
Script Source Files
Main IRCAL User Interface
IRCAL images are named ircalxxxx.fits where xxxx is 0000 through 9999. For example, exposure number 51 will be in a file named ircal0051.fits. Press the Set buttons to the right of each entry to set the information. If you do not press the Set button, IRCAL will use the previously set information. This allows you to change parameters for the next exposure while the current exposure is in progress. The Set buttons change color (pink or red) when something has changed, but hasn't been set yet. When a Set button is red, it must be pressed before a new exposure is taken.
You may also set the Object name, Comment, and Program. These are all written into the FITS header. As above, no changes in these settings are registered until the Set button is pressed.
The Expose button actually starts an exposure (or series of exposures if NExpose is greater than 1). When an exposure is in progress, the Expose button will turn blue and a countdown timer (in seconds) will become active below the Expose button. In addition, the status message above the Set button will become active, usually stating "exposing". The Expose button will be red when a script is waiting for the AO or IRCAL operator to close the AO loops and press the AO Ready button on the WFS Steering and Nodding window.
The Abort Exp button aborts an exposure in progress. A FITS file will be written to disk, but the header information will have the requested exposure time, not the actual exposure time before the Abort Exp button was pressed and will have no header info reflecting the fact that the exposure was aborted.
The Stop NExpose and Pause NExpose buttons will stop or pause a series of exposures in progress. The pause button becomes a resume button once pressed.
The auto display latest radio button sets whether an image is automatically displayed or not. When on (i.e. sunken and red in color) the images will be automatically displayed in the IRCALdisplay window.
The data disk status (space available, usage, etc.) is shown at the bottom of the window. It updates after every exposure.
All data are automatically logged to a file called YYYY.MM.DD.log (e.g. 2007.02.16.log). A new logsheet is created with a new date at noon.
The ircalui File menu contains only two items: Source... and Quit. File - Source... allows a Tcl file to be loaded into ircalui. This is not normally an option used by observers, but is a way to load new dithering scripts into ircalui. Exit ircalui by clicking on File - Quit.
Main Interface Config Menu
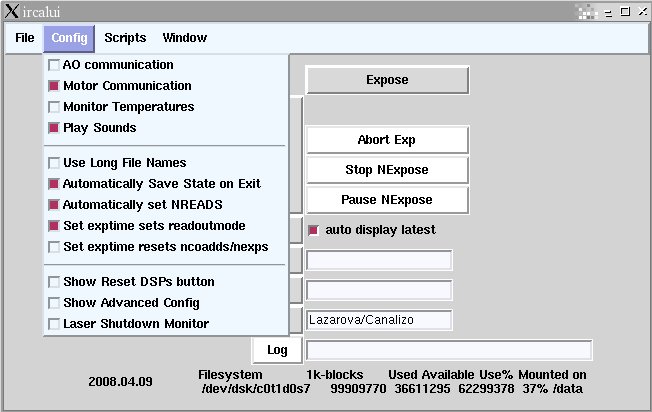
The Config menu contains a number of options for ircalui (red checkbox indicates option is on):
Config - AO Communication allows communication between IRCAL and the AO software. AO software must be connected to traffic for this to work. Upon startup, ircalui checks to see if AO communications are possible, if not it will set this to off.
Config - Motor Communication allows communication with IRCAL's filter and aperture wheels. By default this is on. Config - Monitor Temperatures is an unimplemented function to allow remote monitoring of IRCAL's PICNIC detector. Currently the temperature is monitored by separate piece of software and displayed on homer in the 3-m control room. Config - Play Sounds connects ircalui to the soundserver software. Default is for Sound to be on, however it should be turned off if you do not want the sound effects or if the sound server is not running.Config - Use Long File Names changes the default file naming convention of ircalxxxx.fits to be ircalxxxx_object_filter.fits, where object is the object name (stripped of all spaces) and filter is the position of the first filter wheel. This option is not recommended for general use because the image display software does not recognize the long names and will not display the images automatically.
Config - Automatically Save State on Exit will save to a file the positions of the filter and aperture wheels, exposure and exposure palette information, etc. automatically. Default is to have this on. Only with severe hardware or software malfunctions would you want this option off. Config - Automatically set NREADS is by default on. This option will automatically set the number of reads of the array to a reasonable value based on the length of the exposure. Special observing programs/configurations may want to turn this function off. Config - Set exptime sets readoutmode is on by default. Most observers will have no reason to change this option. This is an advanced option for those users changing the readout mode (from the Config - Show Advanced Config menu, see below) and wish the Set button for the Exposure time, Nreads, and Coadds to not set the readout mode parameters (e.g. number of resets, size of subarray, etc.).Config - Set exptime resets ncoadds/nexps is similar to the above selection except that it also resets the number of coadds and exposures to 1 when the Set button is pressed.
Config - Show Reset DSPs button is off by default. When on, the ircalui window will show another two buttons: Reset DSPs and Force Expose Done. Reset DSPs will reset the hardware talking to the array, which should only need to be done if there has been a power cycle or glitch of IRCAL's electronics. Force Expose Done will force the hardware to finish an exposure if there has been a hardware or software glitch. Neither of these buttons should need to be used in normal operations.
Config - Show Advanced Config is off by default. When on the main ircalui window will expand with a new section (shown below). This section allows you to change the readout and data acquisition parameters of the array.
NResets is the number of times the chip is reset before the exposure starts. Typically this will be 16 unless you choose an exposure time off the Exposure Palette that specifies a different number of resets.
Subarray X Size and Subarray Y Size control how large a subarray is read out for each amplifier. Default is 128 for each axis to read the entire 256x256 array.
The Mode pulldown menu has four options: 3 us/pix Normal, 1 us/pix Normal, Fast Subarray, and Hybrid Subarray. 3 us/pix Normal is the default mode and should be used by almost all observers. 1 us/pix Normal changes the readout speed to 1 us/pixel, however, the optical fiber connection between the camera and ircalbox2 prevents more than 2 quadrants from being read out when in 1 us mode. The 1 us mode also has high read noise (~80 e-) and is not recommended.
Fast Subarray and Hybrid Subarray modes are special purpose modes that are not recommended for general use. Observers wishing to use either of these modes is encouraged to contact a support astronomer before submitting an observing proposal. Fast Subarray will allow a small portion of the chip to be read out very quickly and each read written to a single FITS file. The Hybrid mode will allow a small portion of the chip to be read very quickly, while the rest of the chip is used for a longer exposure.
The CDS pulldown menu allows you to choose the readout mode. The choices are Normal MCDS (default), MCDS No Sub, and Save All Frames. Normal MCDS is strongly recommended for data taking as it does correlated double sampling (or Fowler sampling if there are multiple reads). MCDS No Sub does the multiple reads, but not the subtraction. Save All Frames saves each read into a single FITS file.
The checkbox for sleep wait is off by default. Sleep wait means that the acquisition process sleeps while waiting for the pixels to come back. Unchecked, the process will busy wait, which uses all the available CPU. The difference in frame acquisition time is about 10ms, which is of no consequence for nearly all applications.
Checking imstream mode was designed for occultations and writes a 'stream' of images into a big data dump file with no headers. This mode is not recommended with out first discussing this sort of observing with a support astronomer.
The speed mode eliminates lots of overhead, such as getting AO system information, and cuts the FITS headers down to something very minimal. This is not recommended because most of the information you might need from the FITS header will not be recorded. The only reason to use either the imstream mode or speed mode would be to acquire thousands of images with absolute minimum overhead.
Config - Laser Shutdown Monitor is an option used during Laser Guide Star observations. The laser shutdown monitor (LSM) reads a text file listing the times and durations of when the laser guide star must be shuttered to prevent irradiating a satellite. If the Expose button is pressed or a script is being executed, the LSM will prevent an exposure from being taken if there is not enough time to complete the exposure before the laser is shuttered.
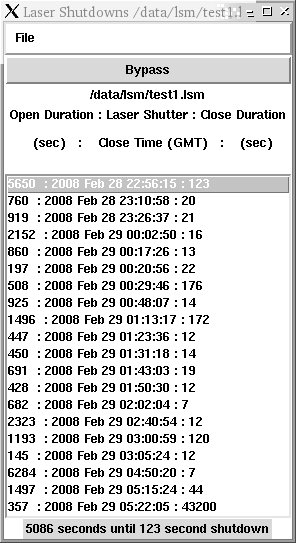
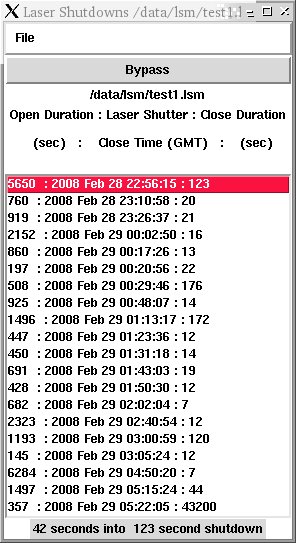
Once a laser shutdown file is read in (see below), the LSM will display a list of the shutdown times and durations. The next shutdown time is highlighted in dark gray. If you are in a laser shutdown time, the current shutdown is highlighted in red. At the bottom of the window is a timer showing how many seconds until the next shutdown. 120 seconds before a laser closure, the timer will turn yellow and at 60 seconds it will turn orange. 30 seconds before a shutdown the timer will turn red and a warning sound will be generated to alert the observer, AO and laser operators that a laser shutdown is imminent.
The Bypass button at the top of the window, when pressed (red in color), allows the observer to take exposures even during a laser shutdown. This is convenient for sky or open AO loop exposures or when a laser shutdown will be short and want to continue a long exposure or script without the laser. When the Bypass button is pushed while you are running a script, you will need to push the AO Ready button to continue the script after dithering.
File - Read brings up a dialog box so you can read in the appropriate LSM file. Each target should have a separate text file (e.g. HIP22760.lsm) in the directory /data/lsm/UTDATE on ircalbox2. By default, the Read File dialog box will look in the directory for the current UT Date. The directory and files will be created for the observer by the AO operator from the submitted LGS target list and the shutdown lists provided by US Space Command.
File - Close simply closes the current LSM file and shuts down the Laser Shutdown Monitor.
Main Interface Script Menu
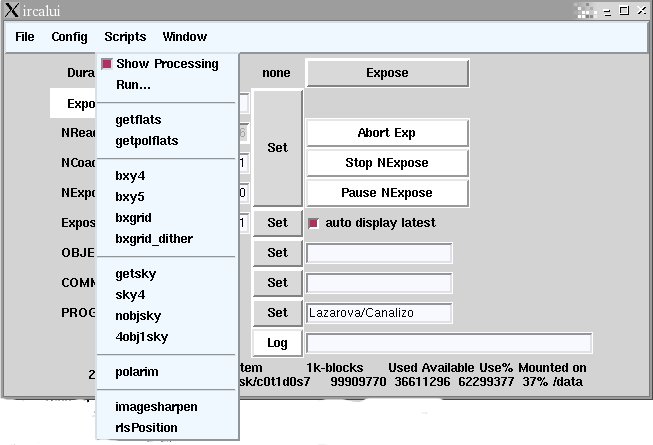
The Scripts menu gives the observer easy access to the most commonly used observing and dithering scripts. For more information on the scripts themselve, see Nodding and Dithering Scripts.
Show Processing should be checked by default and will bring up a separate GUI showing the steps in the script and options for pausing the script or skipping foward or backwards in the script. Unchecking this will prevent that GUI from being created.
The Motor Control window controls the two filter wheels and the aperture wheel.
The Filter1, Filter2, and Aperture labels are red when the motors are in unknown positions. These labels are white when the Current and Desired filter wheel positions are the same. The labels are pink when the Current and Desired filter wheel positions are different.
The Current filter wheel positions (or last recorded positions, if Status unknown) is listed for each wheel.
The Desired or next filter wheel position is specified using the pull-down menus.
You move the the motors to the Desired positions by pressing the Move button. Depending on the mode (AO communication on or off as set in the main ircalui Config menu), determines whether the motor power is automatically turned on and off. There is significant 60 cycle noise on the chip when the motor drivers are on during readout, so it is always wise to check that the motor power is off. The Power button is gray when the power is off and green when the power is on. If AO communication is on, you can use the Power button to turn the motor drivers on and off.
A current list of filter positions is available. Please note that the home motor position on the filter menus is where the motor controller thinks home is and the home position is not determined by the limit switch. To home the motors according to the limit switches you need to click on Config - Home Motors.
Currently the File and Help menus are not active. However, the Config menu has many useful options if anything goes awry with the motors.
 |
Config - Home Motors will move the home enabled motors to their
home positions as determined by their limit switches.
Config - Dark moves the motors to the proper filter positions for taking dark exposures. You can also do this by hand my moving the filters to BrG-2.16 Blank25 Pinhole-30um. Config - Open moves all motors to the open position. Config - Enable FW1 Home when checked, allows Config - Home Motors to move the first filter wheel.Config - Enable FW2 Home when checked, allows Config - Home Motors to move the second filter wheel. Config - Enable Ap Home when checked, allows Config - Home Motors to move the aperture wheel. Config - Enable FW1 Jog, when checked, allows the first filter wheel to be moved a number of steps for proper positioning. Typical jog motions are a few hundred steps. Config - Enable FW2 Jog, when checked, allows the second filter wheel to be moved a number of steps for proper positioning of the wollaston prism or grism. Typical jog motions are a few hundred steps.Config - Enable Aperture Jog, when checked, allows the Aperture wheel to be moved a number of steps for proper positioning of the slit or pinhole. Typical jog motions are 500 to 1000 steps. |
|
|
Config - Advanced - Exit Status Loop is an option you can use if
the Status starts showing odd characters. The motor controller sometimes
gets confused and this is the only way to get it to stop updating garbage
every second. Typically after exiting the status loop, you will have to
fix the source of the problem. Typically reseting and re-initializing the
motor controller will fix the problem.
Config - Advanced - Exit Loop, Reset, and Enable is an option you can use if the Status starts showing odd characters (see above). This button does the following: Exit Status Loop, Reset Ctrl, Init Ctrl, and Enable Move. This does in one step what otherwise would be done by pressing the four listed buttons when there is a motor communication problem. Config - Advanced - Stop Motors allows you to stop the motors if you experience a problem with motor motion. Config - Advanced - Enable Motors allows the motors to be moved. Config - Advanced - Disable Motors prevents the motors from being moved. Config - Manual Home allows you to tell the software that each motor is at its home position (typically after manually positioning each motor at its home switch). This is only used in the rare case when a home switch fails. Config - Advanced - Abort Cmd List aborts the current sequence of commands sent to the motor controller. Rarely needed or used. Config - Advanced - Clear Buffer clears the command buffer for moving motors. Rarely needed or used. Config - Advanced - Get Status gets the status of the motor controller for each motor. Config - Advanced - Home Status updates the motors' home status. Config - Advanced - Reset Ctrl resets the motor controller. Config - Advanced - Init Ctrl re-initializes the motor controller by sending it the initial settings. Init Ctrl only works if the motor controller is powered on. Config - Advanced - Enable Move allows to to make the Move button active if it has been disabled (usually it gets disabled if there was a problem moving motors or homing motors). It is best to make sure any problems are fixed before clicking Enable Move. Config - Advanced - Remote Power Switch is on (checkbox red) by default and allows the power button in the Motor control window to communicate with the AO software (only if ircalui Config - AO Communication is on) to turn the motor controller box on and off. Config - Advanced - Always init is off by default. If checked, it will re-initialize the motor controller before every move. Re-initialization is usually unnecessary. |
|
|
Please note that none of the Config options will work
if ircalui - Config - AO Communication is not checked.
Config - Counter Nod (default is checked) enables the IRCAL software to move mirrors in the AO system to keep the natural guide star on the WFS (NGS mode) or the tip/tilt sensor (LGS mode) during dithering or nodding. Config - Auto Open Loops (default is checked) automatically opens the AO and tip/tilt loops before moving the telescope and counter-nodding the AO optics. Loops will not open if the telescope move is less than the Loop Limit. Config - Auto Close Loops (default is unchecked) will automatically attempt to close loops after the telescope and counter-nods are done. This is not recommended unless the observer is extremely familiar with the AO software and hardware. Auto Close Loops will not function in LGS mode. Config - Update Position communicates with the AO system to update the field steering offsets displayed in the WFS Nodding window. Config - Update Loops retrieves the current AO and TT loop status from the AO system. Config - Go back to On Axis moves the field steering mirrors and telescope back to the on-axis position. |

Click for full-sized image. |
This window allows you to move the telescope, but does not
countersteer the WFS optics. This window is predominately used to
steer the telescope off the object for sky frames. TT and AO loops will
automatically be opened before moving the telescope with this GUI.
There are two methods for moving the telescope: the Grid and Relative Offsets. For Relative Offsets, you enter the desired move size in arcseconds for both RA and Dec. East and North are the positive RA and Dec directions. Press the Move button in the Relative Offset box to move the telescope. The Grid allows you to move the telescope and keep a record of which direction you moved. Each box on the Grid corresponds to a move of x arcseconds, where x is the Scale size of the grid. Set the Scale(") of the Grid in the scale box and press Reset Grid. Reset Grid not only changes the scale size for the grid, but also recenters the current position of the telescope (i.e., the center box of the grid will be yellow). Pressing Reset Grid will erase the record of previous offsets you have made using the grid. To move the telescope using the Grid, click on where in the grid you want the telescope to move. That grid box will turn blue, denoting the desired telescope position. Press the Move button to move the telescope. Status of the move is displayed below the Move button. Upon completion of the telescope move, the desired grid position will change color from blue to yellow, indicating that the telescope move was successful. To move the telescope back to the starting position, just click on the center square of the grid and press the Move button. |
|
The Exposure Palette lists a number of standard exposure times in
milliseconds and number of reads. When you click on an exposure time
it updates the information in the main ircalui window. The numbers to
the right of each button are the number of images (including number of coadds)
taken with that
exposure time and number of reads. When you input a custom exposure
time, number of reads and erases, it will update the Exposure Palette
accordingly when Config - Rebuild is clicked.
The button label format is as follows
File - Take Darks brings up the Dark Widget for taking dark exposures. File - Update Reference Biases will create a new library of dark frames of the most commonly used exposure times ("reference biases") that are automatically subtracted from data. This command should only be executed by observatory staff as it takes a long time and is not intended to be a substitute for darks taken with the Dark Widget at the end of each night by the observer.Config - Rebuild adds exposure times and configurations that have been used to the Exposure Palette. Usually this command is unnecessary because new exposure configurations are added as they occur. Config - Edit brings up a separate Edit window listing all the current entries in the Exposure Palette. Checked (red) checkboxes indicate that the exposure will be included in the Exposure Palette, unchecked exposure times will not be included. When finished editing, click OK button. If you remove an exposure time from the Exposure Palette, there are a few ways to re-insert it into the Palette. Easiest is to take an exposure of that type and Rebuild the Exposure Palette. If the desired exposure is in one of the default lists (see commands below), you can reload the list. If you have already taken an exposure of the desired exposure time, just Rebuild the Palette and it should reappear. The following three commands import a list of exposure times into the Exposure Palette. Exposure times that you have used that aren't on the default list are retained in the Exposure Palette. Config - Add Default Short Exps loads a default set of short exposure times into the Exposure Palette. Config - Add Default Long Exps loads a default set of long exposure times into the Exposure Palette. Config - Add Default All Biases loads the list of exposure times for which Reference Biases are available. Config - Zero sets the number of exposures taken for each exposure time to zero. This is advisable at the beginning of every night (or observing run) so that when running the Dark Widget at the end of the night (or run) will only try to take darks of the exposures that were actually used during the night. |

Click for a full-sized image. |
The Dark Widget looks at what exposures have been taken on the Exposure Palette and calculates how long it will take to do darks, with some assumptions concerning number of darks and coadds, for each exposure configuration. You can modify the number of darks and number of coadds until you reach an acceptable total time for the darks. We recommend observers try to pare down the list of dark exposures so they take less than three hours of darks (taking more darks runs the risk of the daytime staff turning on lights when filling IRCAL's dewar, etc.). Pressing Start will move the filter wheels to the Dark position and will start a script for taking the specified dark images. The No Aperture Move checkbox, when selected, will prevent the aperture wheel from moving to the standard dark position. This is useful if you don't want to alter the position of the aperture wheel in polarimetric or spectroscopic mode. |
Click for full-sized image. |
A few handy scripts are available for nodding or dithering the telescope and AO WFS. The commonly used scripts are in the File - Scripts menu of the ircalui GUI. A more detailed description of the current Scripts and how to use them is available. Other (or newly created) scripts can be loaded in by using the File - Source... menu on the ircalui GUI. |
Window Menu
 If you have hidden an ircalui window or closed it accidently, you
can bring it forward by clicking on its name in the Window menu.
If you have hidden an ircalui window or closed it accidently, you
can bring it forward by clicking on its name in the Window menu.
Elinor Gates Last modified: Thu Jan 19 11:49:34 PST 2012