Data Taking System
| The data taking system (DTS) runs on kablooie
(blue side) and kaready (red side). Observers do not log into
these computers directly, but rather use the commands
kastbstart and kastrstart to start the DTS for the blue
and red side, respectively, from the user account on gouda,
karnak, or shanevnc.
A sample DTS screen is shown in Figure 1. The red and blue sides are
run independently, with a separate set of parameters for each. The
operation of the data takers is identical for both sides, however the
blue side control windows have a blue background, and the red side a
red background to make it easier for the observers to distinguish
between the two.
The window for detector parameters and exposure control has three levels, reached by tabs along its left margin. The user will be concerned primarily with the top level in the course of observing. The 2nd level controls a few parameters that usually need only be set once at the beginning of the night. The 3rd level is for engineering. It is not intended for the use of observers and is not described here. Kast's image display is described elsewhere. |
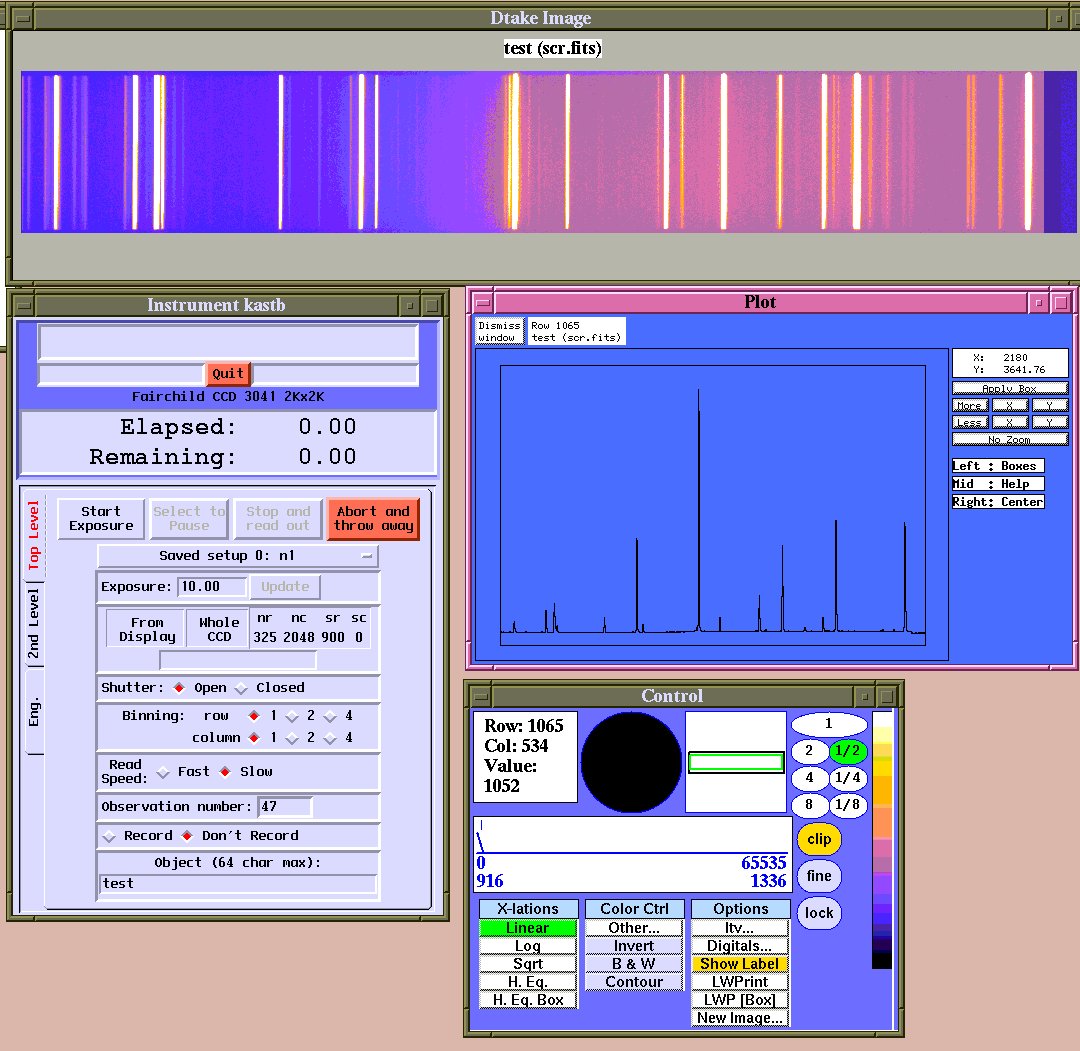
Figure 1: Data Taking System |
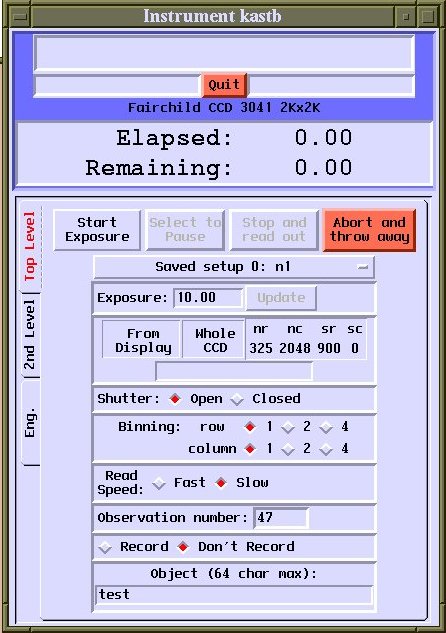
CCD Control Window: Top Level
 Click for a full-sized image.
|
The top level of the GUI allows one to set various detector parameters in
advance, and to control exposures. Parameters are briefly described here.
Commands for controlling exposures -- start, pause, stop, and abort -- are
self explanatory.
Saved Setup Parameters are stored as one of ten "saved
setups." Current parameters automatically become whichever saved setup is
selected at the time. Saved setups may be named on the 2nd level. Exposure time Zero-second exposures and fractional seconds are allowed. Note that for short exposures shutter fly time errors can become significant. The "Update" button is not yet implemented, but will allow one to change the exposure time of the exposure in progress. E.g. you start a 1200s exposure, but if you decide more exposure time is necessary, you may enter the new total exposure time and press "Update". You may also choose to do a shorter exposure this way as long as the new exposure time is longer than the current elapsed exposure time. CCD Window This is the amount of the CCD which is actually read out. Smaller windows read out more quickly. The window size may be defined graphically from the image display, or by entering the number of rows, number of columns, and origin of the readout region. To define a window from the image display, type "b" in the image display windo, then use the mouse to click on the first corner of the box, then click again on the opposite corner of the desired region. Once the desired region is selected, click on the "From Display" button. To readout the entire CCD, click the "Whole CCD" button. Shutter Open for normal exposures, closed for darks and bias frames. Binning Kast is generally used binned 1x1 for normal observations. However, each axis may be independently binned by 1, 2, or 4 as data acquisition requires. Read Speed Fast is about half the time of slow for the red CCD, and about a third of the time for the blue CCD, gained at the price of increased readnoise (see CCD Characteristics). Observation Number and Recording The observation number increments with each recorded exposure. The red and blue data takers have independent numbering and the start number can be whatever you choose for each data taker. It can be set manually, but be careful, it is possible to overwrite existing data by setting the number back. Note that the last unrecorded exposure is saved in /scratch/kastred/scr.fits or /scratch/kastblue/scr.fits. More on recording images in "2nd Level," below. Object The string entered will appear as the OBJECT card in the image's FITS header. | |
|---|---|---|
CCD Control Window: 2nd Level
 Click for a full-sized image.
|
The 2nd level GUI presents parameters that are usually only set once in the
course of a night, if at all. Only a few of these are for observer
use. MPP and Amplifier selection should remain as set by default, unless
there is a clearly understood reason to change them.
Saved Setup name This allows a name to be associated with a
saved setup (see Top Level). Record count Whether an image is recorded or not is controlled from the Top Level by turning recording on or off. The "record count" parameter is generally set to "1" or "-1" so that all images are saved whenever recording is turned on. Directory This parameter should be set to "/data/" so that recorded images are saved in the /data directory on kaready or kablooie (for red or blue images, respectively). The data paths from the user computers in the 3-m control room are /data/kastred/ and /data/kastblue/. Please do not change this parameter, it is important to save them there so that they will be found and saved in our archive. Data become available in the on-line data archive shortly after being acquired at http://mthamilton.ucolick.org/data/ in password protected directories. Contact a Support Astronomer if you need to set or reset your password. If there are data in the directories from a previous observer's run, contact a Support Astronomer or Telescope Technician so they can make sure data are properly archived before clearing the data. Root The string entered here becomes the root of the image file names, prepended to a unique image numbe. E.g., using the parameters shown here, the first recorded image will become /data/r1.fits, the second r2.fits, and so on. The root can be whatever you wish, but we recommend that you use the default "r" root for the red images and "b" root for the blue images. Suffix You may choose the suffix to be appended to your image file names, but it must be one recognized by our automatic archiver: fits, ccd, fts, spr, or sdt. We prefer that you use fits as the suffix for Kast data. Observer's name You may enter any number of first or last names up to a total of 64 characters. White space and comma separation are permitted. The string will appear in the "OBSERVER" field of the FITS header. | |
Support Astronomers (sa@ucolick.org) Last modified: Wed Jul 6 09:01:08 PDT 2016